Thursday, 19 May 2016

An honest and open post about my recent struggles....

I'm going to be very honest with you now, I've had a crappy few months and I have tried to keep going but I have lost my mojo. It's up and left and taken my creativity, writing ability and general get up and go with it.  We all have times like this and sometimes it's best to power through or change the routine to inspire and mix it up a bit.  This has not helped me and I'm going to tell you why in a very open and honest post.

I have battled with mental illness for most of my life and I normally keep it under control and under wraps, some of my friends and family don't know.  Not because I have intentionally kept it from them but it's not my opening line when I meet someone, "Hi, my name is Fiona I suffer with OCD, depression and anxiety, nice to meet you!" can you imagine?! I don't let it define who I am so I don't mention it unless it's relevant to a conversation. In my teenage years when it started there was such a stigma so I kept my difficulties quiet and when I was working I kept it private as I didn't want it to affect my career prospects but now I feel more comfortable to be open, it also helps me too to be open.

Recently the depression has taken hold of me which affects my OCD symptons.  I recognise things have taken a turn for the worse so I have sought professional help. Creating and making things used to be my distraction and saviour but it just doesn't cut it any more, sadly. To be honest nothing gives me joy. I'm doing what I can when I can so it means my business is suffering and I am not achieving the goals I have set. My writing for this blog is becoming sporadic which I also didn't want, it gives me more of a reason to beat myself up!

I know I have an emotional few months ahead whilst I go through CBT (Cognitive Behavioural Therapy) again. It won't be easy but I have to keep positive that there will be a light at the end of the tunnel once I get through the hard work.  I am very lucky that I have a supportive husband and great family and friends around me.  Whilst I focus on my mental health, I may find it difficult to post regularly and update my shop with new products. I want to get well and be able to get ready for the busy Christmas period and start 2017 a happier and healthier me.

I also thought this was important to share because I know there are millions like me out there and I want you to know that you are not alone.  You can still achieve things in your life but you just have to know when you need to get a little bit of help and don't be ashamed to ask. If you are suffering please don't do it alone, speak to family or friends if you can but please, please go and speak to your doctor. I may be going through a difficult time but I'm feeling positive that I will survive and will be back to my usual self.

Life's a journey and sometimes there are pot holes in the road along the way but they can be fixed.


fizzi~jayne x

Thursday, 28 April 2016

Top Business Tips by Fiona Pullen....

This week we had a special guest host on #CraftBlogClub, the lovely Fiona Pullen founder of The Sewing Directory and author of Craft a Creative Business. It was such an inspiring chat with lots of top tips from Fiona that I had to share her wisdom....


I started off the chat by asking what her top tip would be to someone wanting to start their creative business?

The key thing that a lot of people skip is to properly research and plan what you want to do, not just jump in.  It's easy for a hobby to turn into a business without business planning taking place.  You make it so much easier on yourself if you plan before you start and know what you are working towards.  I drew up a timeline of what I needed to do when before launch and worked through one task at a time.

How would you go about finding out who your audience are? Or do you decide who to target?
  • The more you can narrow down who will buy your products the easier it is to market. Try asking friends who you think would buy them. Think about what kind of person would buy your product/service (age/sex/budget)
  • You can survey followers/customers to find out more about your audience or research who is most likely to need/want the product you sell. 
  • Your target market will partially depend on your product, also on your price and where you market it.
  • It helps to have a niche as that narrows your audience.  But see if this post helps.

How can I run a business when I work full time?

It takes a lot of commitment when working full time and to set aside hours for a business too. Some people find it best to commit set hours each week eg. every Saturday morning to make sure they make progress.


How far in advance should you promote a new seasonal range, for example Father's Day?

At least 4 months ahead: magazines work around that far ahead plus you need to remind people several times. Even if they don't buy that early you are getting your products into their mind well in advance.


I find it hard to do everything I want creatively as well as the marketing, admin etc. How do you do it all?

You have to be really disciplined and schedule things well to ensure everything is covered. Often you end up having to prioritise when you run out of hours in the week!  Accepting I couldn't do everything was a huge turning point for me and a big drop in stress.


That raises an interesting topic: employees/partners/outsourcing.

Finding the right partner helped, I trusted Julie to carry the site on the way I wanted. We had big chats first to make sure we had the same goals for the business and were in agreement. We spent around 4 months discussing it all before we made that leap.  I wanted someone to get involved as I was, it makes the other person as invested as you, quite literally!  It's very scary as it's hard for either of you to walk away, so you need to be pretty sure about the partnership before committing. It was a leap of faith!
I did a couple blog posts about taking on a partner here.


What social media do you recommend ?
  • Twitter seems to grow fast (follower wise) but I find it gives less clicks.  Perhaps because it's fast paced.
  • You need to think about where your target audience will be spending their time rather than trying all new platforms.
  • I recommend one or two platforms, for most people that is plenty to keep on top of.  Mix promotional posts with non promotional posts.
  • Pinterest works like a search engine so use relevant keywords in board titles & pin descriptions and create lots of niche boards so you can pin your own stuff in more than one place. We tend to work to a 1/10 ratio. 1 of our pins then 9 pins of other people's stuff.
  • Instagram is proving very popular at the moment.  Visual platforms work well for craft products
  • People don't like to feel marketed at all the time. See these social media tips for other things to post about.

Don't be afraid to fail, that is what holds most people back from even starting a business. Even if you have run a business before, take the skills and lessons from one business into the next and keep trying until you find the right business for you.

Thank you Fiona for being a great guest host! I hope I caught everything from our chat.

If you would like more advice on running a creative business, I recommend reading Fiona's book, I wrote a review which you can check out here.  


Want to find out more about Fiona?...
Visit her website craftacreativebusiness.co.uk
Follow her on Twitter and Pinterest

You can find out more about #CraftBlogClub chats here, we are a friendly bunch and if you would like to meet fellow crafters and bloggers we chat every Tuesday at 7pm (GMT).

fizzi~jayne x

Wednesday, 20 April 2016

DSLR Product Photography Class....

Last week I attended a great product photography class at DSLR Photography Courses. It was a full day and with only 4 of us in the class we received customised tuition. We learnt about shutter speed, aperture and ISO and I'm so happy that I can confidently use my camera on fully manual now! Before I was only able to use it on shutter speed / aperture priority mode but now I know how to use all three functions together.  By understanding all the elements I can control the light and take better photographs.

We practiced lots with our cameras using our own products as well as having some fun with action men....
  • Experimenting with depth of field


  • Focusing on an object in the background


  • Focussing on the object at the front

I also learnt about metering, it turns out the bar in the view finder actually means something! By over exposing a white background it looks white (not a dirty off white which can happen) and under exposing makes a grey or black background actually look like their true colour not a bleached out version.
  • Over exposed

  • various levels of exposure on a dark grey background

  • We had a chance to work with studio lights and controlling shadows with diffusers and reflectors. This image was taken using flash lighting

Furniture made by a fellow class mate http://www.tortiehoare.com/
We were also given an introduction to Macro photography.  The detail of a macro lens is amazing and a must especially if you sell jewellery, although the price tag for these lenses is not cheap! Needless to say I will get to grips and make do with my prime lens for now.

If you want to improve your product photography I would recommend a similar course and if you are in the London area check out the courses available at DSLR Photography Courses. I was really impressed with their studio set up and our tutor Katerina was very knowledgeable and inspiring.

I need to practice now and hopefully you will see improvements with my photography in the future.

fizzi~jayne x

Sunday, 27 March 2016

Guest Blogger ~ Standing Stitch Tutorial by Katherine Hajer....

We're nearly at the end of National Craft Month, have you tried any new crafts? 
I hope you have enjoyed all the guests I've had on my blog this month.  For the final instalment, Katherine is back sharing her tutorial on crochet standing stitch.

You can see her foundation stitch tutorial which she shared at the beginning of the month here.

Over to Katherine....
Here’s a situation: you are crocheting something in stripes, and you've got to the point where it’s time to change colours and start the next stripe. If you do things the traditional way, you:
  1. Drop the old yarn at the penultimate step in completing the last stitch on the old row.
  2. Pick up the new yarn and complete the stitch.
  3. Chain however many you need to start the next row.
  4. Turn the work.
Or maybe: you are working on a multi-coloured motif, and have finished off the old colour. Now you’re supposed to attach the new yarn, chain up, and keep working. Except, if you’re like me, that starting chain is always very obvious, and it bothers you.
Here’s an alternative: you could skip both those scenarios and just use a standing stitch.
A standing stitch is a method used to join new yarn to an existing piece of crochet without having to do any of the steps listed above. It also has these additional benefits:
  • The old yarn is fastened off completely before the new yarn is added, so you don’t have to worry about keeping two different yarns under control as you add a new colour.
  • You don’t have to work back and forth. If you want to work right to left for a one-row stripe, then start at the right-hand side again and work right to left again for the next one-row stripe, it’s just as easy as turning the work and going the opposite way.
  • If you’re working in the round, you can stagger your start and stop points each stripe so that you don’t wind up with all your loose ends in one spot. This is very handy on granny squares!
(Note: since this post is being published on a British Web site, British crochet terms are used throughout. Here's a handy list for converting terms.)
If you prefer a video demonstration to written instructions, you can watch this.
What you need before you start: something to crochet onto. Usually this will be a piece of crochet that’s already done. If you are finishing a round/row and then starting a new colour, finish off the old yarn as if you were completing the piece (ie: clip yarn, pull short end through last stitch).
Proceed:
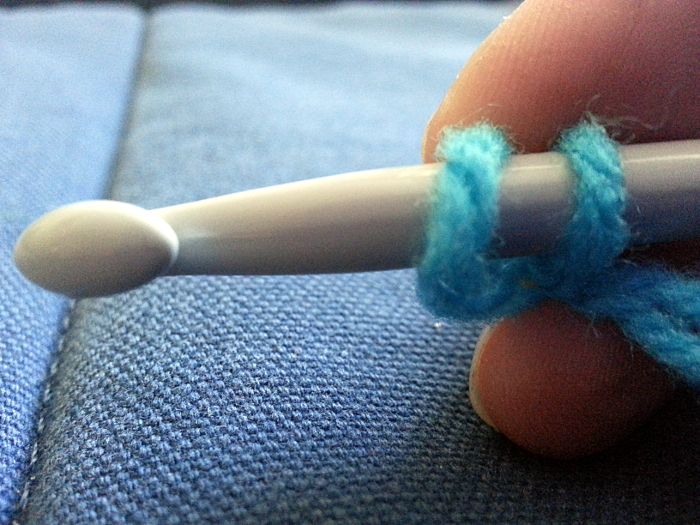
  1. There are different ways of doing this, but you want to have as many loops on your hook as you would have before you inserted your hook for a new stitch mid-row. In the photo below, I'm going to join the new yarn with a treble, so I have two loops on my hook. Crocheters more experienced with the technique often just use a backward loop and a regular yarn over, but if you’re trying this for the first time, I recommend making a slip knot for the first loop so everything stays secure.
    01 standing st starting lp.jpg
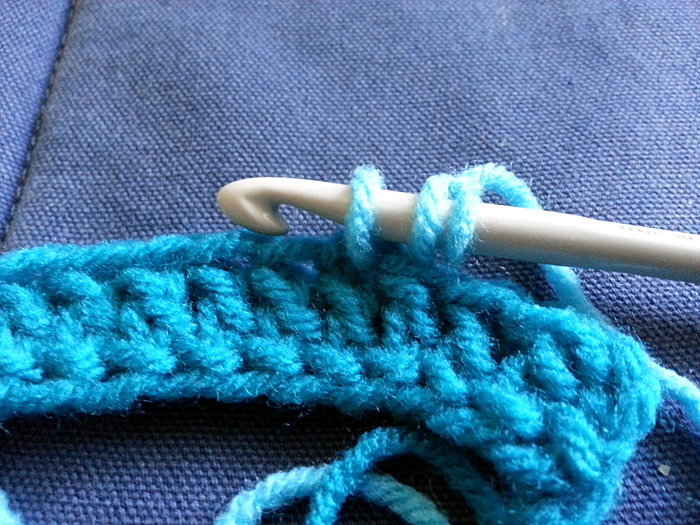
  2. Insert your hook into the work and work a stitch as normal. Once the stitch is complete, the new yarn will be attached to the work and you can work the rest of the round/row as normal.
    02 standing st attach to work.jpg
  3. That’s it! If you did use a slip knot but do not like knots overall, you can pick it open with a tapestry needle when you are finishing your loose ends. Or you can just leave it.
Note that working a standing stitch means the beginning tail of your new yarn will be located at the top of the first stitch in the new yarn, rather than the bottom as it would be using the traditional method. This doesn't make darning in the ends any easier or harder than using the traditional method. It just means you may have to use a slightly different strategy than normal when you’re finishing.
-------

Thank you Katherine for sharing not one but two crochet tutorials on my blog this month! 

Find out more about Katherine over here....
check out her website
find Katherine on Twitter


A big thank you to all my guests who have shared their craft tutorials to help me celebrate National Craft Month. You can see all their tutorials here, including the ones from last year.

I always like to see what you make from the tutorials on my blog. If you make anything I'd love to see them so please tag me in your social media posts or leave your links in the comments below so I can check out your makes.


fizzi~jayne x

Monday, 21 March 2016

Guest Blogger ~ Upcycling Project by theMessyBrunette....


It's time for another guest to celebrate National Craft Month! Maura from theMessyBrunette is sharing a tutorial for an upcycling project. I do love upcycling, mainly because I can't bear to throw anything away and it gives something a new lease of life.

Over to Maura....


Hi, my name is Maura and I blog over at theMessyBrunette.  I love crafts and upcycling projects and I also crochet.  I eat far too much chocolate and spend too long on Pinterest.

A big thanks to Fiona for letting me guest post on her lovely blog.  I hope you enjoy my post and please feel free to pop by my blog for a visit.

I've posted before on decoupage and using it on upcycling projects, you can read about it here.  With this project, I had some plate chargers, you know the ones that make an appearance at Christmas. Well, we had a bunch of these that we never used and I was going to dump them, when I thought hmmmm maybe they could be used.  So I decided to try and cover them with some paper and make them seem like they're old and vintage looking.

So here's the plate before - just your regular silver plastic plate charger, nothing fancy with this one.  You can get this in the Pound/Euro shop, they are not expensive.

And here's the after.  I did 4 plates with 4 different looks using napkins on some and scrapbook paper on others.  I wanted the plates to look old and worn, kinda vintage looking. What do you think?


Want to know how I did it? Well here's a little summary.

NAPKIN PLATES:

The aim was to make the plates look old & worn, vintage looking ......
  • I cleaned and lightly sanded the plate
  • I painted the plate in white. I did two coats to give it a good coverage.
  • I separated the napkins and only used the first layer - see below, it's important you only use the first printed layer.  I tore the pieces that I wanted to use and played around with the design. (On the green plate I didn't tear it up I just carefully placed it on the plate and glued it bit by bit & blended it in.)


  • I then used some decoupage glue (you could use some watered down PVA or Mod Podge but I find this glue the best with napkins) and glued the napkin pieces.  They wrinkled in places but I didn't mind as I think the wrinkles make them look old.


  • At the edges, I used some bitumen (a liquid paint for decoupage) and rubbed it along with my finger.  You could use some dark wax but be careful, a little goes a long way.  I used some on the inner rim as well.
  • Next up I used some rice paper (rice paper is a little bit thicker than napkins and easier to use I find). I had some with "home sweet home" printed on it. I tore around the print and glued this on top of the napkin and lightly sanded it to blend it in.  I used some bitumen on this as well to age it.

  • On the blue plate, I used some gold leaf around the edges

  • I sealed the plates with some clear varnish and lightly sanded them when they were dry.  I repeated this process until I was happy with the result.  Be careful here as you don't want the paper to tear. Just lightly sand it!

SCRAPBOOK PLATES:
  1. I cleaned and lightly sanded the plate
  2. I soaked the paper in water and peeled off the back, I did this as the paper was a bit too thick to use and it was easier to use if the paper was a bit thinner.
  3. Using some decoupage glue I glued the paper down to the plate and rubbed it into the plate's rim and all around.  Now it did wrinkle a bit here and there, but as I wanted it to look a bit old and worn I didn't mind this. Wrinkles can be good!
  4. Now the paper didn't cover the plate fully, there were gaps on each side.  So I used some regular acrylic paint and blended the paint to the colour of the paper.  I sanded and distressed this until I got the look I wanted.
  5. Next up, I used some gold leaf.  I just placed the glue on the parts I wanted the gold leaf to appear, this was in and around the edges of the plate. I wanted the plate to look old and that the paper was peeling and coming away.  I used some bitumen to make the paper look old in places as well.  You could use dark wax or even an old tea bag to stain the paper.
  6. I left it to dry and coated it again with the glue to seal it. I lightly sanded it afterwards, the paper part only.  I did this a couple of times to make sure everything blended in together.


Note: these plates are only for decorative purposes, just a wipe of a cloth will keep them clean.

So that's it, hope you enjoyed the process, if I have left anything out or you need to know more please comment below.

So have you done any upcycling lately?

------

Thank you Maura for sharing your upcycling project. You can find lots more of Maura's crafty DIY projects as well as baking goodness on her lovely blog. Maura is also on Twitter and Instagram.

Just a tip from me, If you can't find bitumen paint, I use Distress Inks for making projects look old and vintage.

If you have upcyled anything, Maura and I would love to see it so please leave your links in the comments or tag us in your social media posts.

fizzi~jayne x