Showing posts with label Craft. Show all posts

Tuesday, 19 June 2018

Win a pair of tickets to the The Creative Craft Show Birmingham....

Win tickets to The Creative Craft Show 

I’ve teamed up with the organisers of The Creative Craft Show to offer you the chance to win a pair of tickets to the fantastic crafting extravaganza, taking place at the NEC, Birmingham from 29 June - 1 July 2018. 

Visitors will be treated to over 100 stands selling the latest supplies, inspirational features and a host of experts on hand to give advice and share top tips.

Features at this show include:
  • a free programme of quick and easy workshops and talks
  • papercraft demonstrations, jewellery making and beading as well as knitting, stitching and dressmaking features
  • the latest products and creations from the world of creative craft
  • new and exciting crafty ideas, tips and inspiration

How to enter....

There are a number of ways to enter the Creative Craft Show ticket giveaway, and each one will be counted as one entry, so do all three and you will be entered three times!

The deadline for entries is midday (BST) on 24th June 2018. The giveaway is only open to UK entrants, sorry my international chums!

The winner will be picked at random and announced on 25th June 2018.


FACT FILE

The Creative Craft Show Birmingham

NEC, Birmingham
29 June -1 July 2018
Open:  10am – 4.30pm (5pm Sat)

Tickets:
Adult £10 (£8 Advance Price)
Senior £9 (£7 Advance Price)
Children free if accompanied by an adult with a valid ticket

For more information or to book tickets please visit www.ichfevents.co.uk.  Alternatively, phone the Ticket Hotline on 01425 277988.

Follow the creative Craft Show on Twitter @thecraftshows
Find them on Facebook – Stitching, Sewing & Hobbycrafts Shows

Ts and C’s
Standard Terms and Conditions apply
Travel costs and expenses to and from the venue are not included in the prize
Deadline for entries is midday in 24th June 2018
Prize has no monetary value and is not transferable
Visit www.ichfevents.co.uk to sign up to the free eNewsletters


sign up for fizzi-jayne news to your inbox....
* indicates required

Tuesday, 27 March 2018

Upcyling challenge....

Spring has finally sprung in the UK which makes it a perfect time for another #CraftBlogClub challenge!

We're going to be upcycling!

Spring is a great time to have a clear out and find old stuff.  Instead of throwing things out why not upcycle? 

What you choose to upcycle and the craft techniques you use are up to you.  It could be revamping an old pair of jeans, turning that sad looking plant pot into fab crafty storage container or refurbishing an unloved piece of furniture.

  • We will be revealing our upcycled projects in our Twitter chat on 25th June 2018 and If you have a blog also present your lovely project in a blog post by this date.
  • Please mention #CraftBlogClub in your blog post and link back to this page.
  • Let us know how you’re doing throughout the challenge on Twitter. Don't forget to use our #CraftBlogClub hashtag.
Anyone can join in the challenge, don't worry If you've never joined a #CraftBlogClub chat before, everyone is welcome!

I hope you will join in and I can't wait to see what everyone makes!!...


Sunday, 27 March 2016

Guest Blogger ~ Standing Stitch Tutorial by Katherine Hajer....

We're nearly at the end of National Craft Month, have you tried any new crafts? 
I hope you have enjoyed all the guests I've had on my blog this month.  For the final instalment, Katherine is back sharing her tutorial on crochet standing stitch.

You can see her foundation stitch tutorial which she shared at the beginning of the month here.

Over to Katherine....
Here’s a situation: you are crocheting something in stripes, and you've got to the point where it’s time to change colours and start the next stripe. If you do things the traditional way, you:
  1. Drop the old yarn at the penultimate step in completing the last stitch on the old row.
  2. Pick up the new yarn and complete the stitch.
  3. Chain however many you need to start the next row.
  4. Turn the work.
Or maybe: you are working on a multi-coloured motif, and have finished off the old colour. Now you’re supposed to attach the new yarn, chain up, and keep working. Except, if you’re like me, that starting chain is always very obvious, and it bothers you.
Here’s an alternative: you could skip both those scenarios and just use a standing stitch.
A standing stitch is a method used to join new yarn to an existing piece of crochet without having to do any of the steps listed above. It also has these additional benefits:
  • The old yarn is fastened off completely before the new yarn is added, so you don’t have to worry about keeping two different yarns under control as you add a new colour.
  • You don’t have to work back and forth. If you want to work right to left for a one-row stripe, then start at the right-hand side again and work right to left again for the next one-row stripe, it’s just as easy as turning the work and going the opposite way.
  • If you’re working in the round, you can stagger your start and stop points each stripe so that you don’t wind up with all your loose ends in one spot. This is very handy on granny squares!
(Note: since this post is being published on a British Web site, British crochet terms are used throughout. Here's a handy list for converting terms.)
If you prefer a video demonstration to written instructions, you can watch this.
What you need before you start: something to crochet onto. Usually this will be a piece of crochet that’s already done. If you are finishing a round/row and then starting a new colour, finish off the old yarn as if you were completing the piece (ie: clip yarn, pull short end through last stitch).
Proceed:
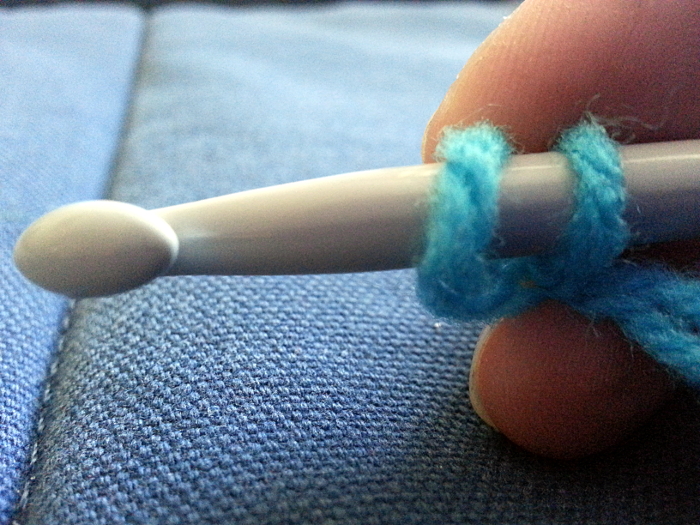
  1. There are different ways of doing this, but you want to have as many loops on your hook as you would have before you inserted your hook for a new stitch mid-row. In the photo below, I'm going to join the new yarn with a treble, so I have two loops on my hook. Crocheters more experienced with the technique often just use a backward loop and a regular yarn over, but if you’re trying this for the first time, I recommend making a slip knot for the first loop so everything stays secure.
    01 standing st starting lp.jpg
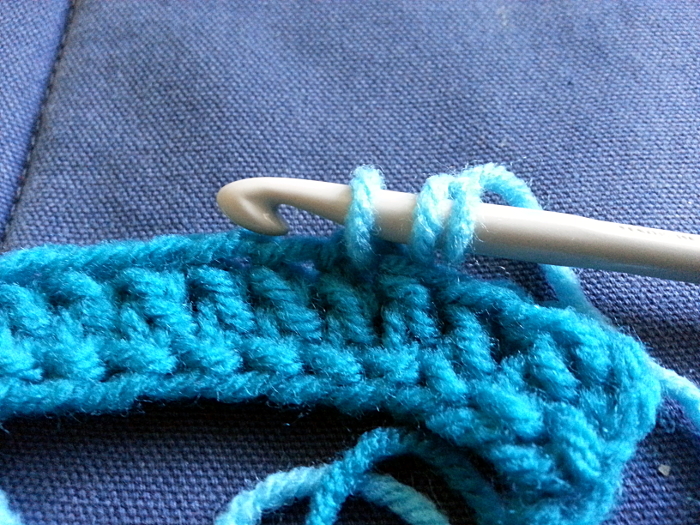
  2. Insert your hook into the work and work a stitch as normal. Once the stitch is complete, the new yarn will be attached to the work and you can work the rest of the round/row as normal.
    02 standing st attach to work.jpg
  3. That’s it! If you did use a slip knot but do not like knots overall, you can pick it open with a tapestry needle when you are finishing your loose ends. Or you can just leave it.
Note that working a standing stitch means the beginning tail of your new yarn will be located at the top of the first stitch in the new yarn, rather than the bottom as it would be using the traditional method. This doesn't make darning in the ends any easier or harder than using the traditional method. It just means you may have to use a slightly different strategy than normal when you’re finishing.
-------

Thank you Katherine for sharing not one but two crochet tutorials on my blog this month! 

Find out more about Katherine over here....
check out her website
find Katherine on Twitter


A big thank you to all my guests who have shared their craft tutorials to help me celebrate National Craft Month. You can see all their tutorials here, including the ones from last year.

I always like to see what you make from the tutorials on my blog. If you make anything I'd love to see them so please tag me in your social media posts or leave your links in the comments below so I can check out your makes.


fizzi~jayne x

Monday, 8 February 2016

National Storytelling Week ~ using scrapbooking to tell my story....

Last week was National Storytelling Week, which I only found out was a thing towards the end of the week.  I wanted to find out a little bit more about it and it turns out there is an actual Society for Storytelling which has been going for 24 years!  It's mission is....
 "....for the promotion of the oral tradition of storytelling, the very first way of communicating life experiences and the creative imagination". 
My niece and nephew love stories and when Auntie Fifi visits they always get an extra story at bedtime!

Anyway, this got me thinking about a craft I have not done for a while, scrapbooking.  You may be wondering where the connection is but bear with me. Scrapbooking is a creative way to tell a story, your story. It's about getting the photos off your computer and sharing your memories.

I have wanted to put together a scrapbook of our wedding since we got married over 6 years ago. So with Valentine's day this weekend what better story to share with you?!....

What I used 
What I did...

I chose to do an 8x8" size, traditionally scrapbooks were 12x12" but they certainly don't have to be. If you are new to scrapbooking and are daunted by filling a large page, this size is ideal.

I used CraftArtist 2 to import my photos and add artistic edges.

If you have not tried digital crafting CraftArtist 2 is straightforward and designed to be used with PCs but you don't have to use software to scrapbook.  

Top tip - if you use your original photographs make sure your adhesive is acid free to protect them from discolouring and disintegrating.

My design from CraftArtist 2
For the background I used a photo of the floral display my mother-in-law created in the church. By using the software I was able to use the transparency to soften it for the background.

The text I added was a poem that I found when researching readings for the ceremony and I came across this one. It's such a lovely poem and described how I felt perfectly so I wrote it in a card that I gave to my hubby on our wedding day. (Sorry if you now need a sick bucket!).

The final image measured 15x15cm and I mounted it onto the pink card and then onto the green card to make it stand out.

I punched a heart design into the printed image before mounting it onto the pink card so the colour shows through.  With scrapbooking don't be afraid to cut or punch into photos.

Gerberas were my flowers for the day, they are such happy flowers, I made my paper flowers by cutting them out with the dies in the green and pink card.


The dies set allows you to make various sizes, so I made one large and two smaller gerberas. I used four of one petal size and then two of a smaller size to create one flower.


Once I cut them out I layered the petals glueing in the centre as I went.  Each layer was slightly offset for a more realistic gerbera.


Using my ball tool I pushed the flower into the mat using a circular motion in the centre of the flower, this adds dimension.

I used creative license to create a gerbera in pink and green!


I added Victorian Velvet distress ink around the edges and added Crystal Stickles to create the middle. I also added a little sparkle on the petals to look like dew drops.


I added a little flourish using the Marianne Creatables dies.


And here is the final page....


You may notice I have also used a green ribbon in the background.  I used this ribbon on our wedding invitations.

I've only done this one page so far, but now I've started my wedding scrapbook I have lots of ideas to create more pages.

Scrapbooking is a great way to showcase your photos and memories so I hope this has inspired you to get your pictures off your camera.

fizzi~jayne x

Disclaimer: The Amazon links in this post are affiliated.

Thursday, 17 December 2015

A quick Christmas card tutorial....

If you still want to make your Christmas cards but you have a lot to make in a short space of time, I have put this tutorial together to make quick cards using my Silhouette Cameo and paper stash.  They are perfect if you have a lot to make or left them to the last minute, like me!


What I used:
  • Silhouette Cameo
  • This stag cutting file
  • This holly cutting file (If you don't have a Silhouette machine but have other cutting machines I'm sure they will have similar files.  If you only have a manual cutting machine you can use Christmassy dies instead.)
  • Textured Mirror Card
  • Christmas paper, you can use any paper or card you already have. It's a great way to use up your stash or even wrapping paper.
  • Card blanks and envelopes, I used two sizes, 6" x 6" (15.24 x 15.24 cm) and 4.75" x 4.75" (12 x 12cm).
  • A good quality PVA glue
  • Double sided tape
  • Gems and embellishment from your stash
  • Optional, 3D silicone glue gel

What I did...


Using the Silhouette Cameo I cut out as many stag and holly shapes I could fit on to A4. The size of the stag and holly will depend on the size of card you use, but for my cards I used sizes:

Stag: 5 x 5.4 inches (12.7 x 13.7 cm) and 4.4 x 4.6 inches (11 x 11.6 cm)
Holly: 3.7 x 2 inches (9.3 x 5 cm) and 3.2 x 1.8 inches (8 x 4.6 cm)

Cut Christmas paper to fit the card.  Sometimes I like to leave a border so I cut 5.5 inches (approx 14cm) to fit my 6 inch square cards.


Top Tip! - When applying paper/card to the card blank I prefer to use double sided tape as it is super sticky but it's not easy to reposition if you get it in the wrong place.  So I put the tape on my paper remove the backing at the corners only, don't take it all off, and ensure the backing is folded back as the picture below....


Where the tape is exposed use a little PVA glue on top of the tape then position on the card blank. The glue will allow you to wiggle the paper into position, once you are happy you can pull the backing of the tape off whilst the glue in the corner keeps the paper in position.

Now you are ready to stick the stag onto the card using glue or to give the card dimension you can use 3D Silicone Glue Gel.  On this card I've added the holly to the corner....


Time to get out your stash of gems, buttons and other embellishments.  

I've added a gem to this stag's nose and to the holly berries....


If you have any die cut sentiments you can use these or why not stamp your own?

You don't need to use the holly, on some of the smaller cards I only used the stag's head...


On this card I also used 3D silicone glue to raise the head slightly.
 Don't be afraid to cut into the holly and use elements of it for a flourish on the corner, like what I've done here...


These cards are super easy and quick to make but each one can be made individual just by changing the colour, backing paper or embellishments you choose to use. Here are some more examples....


If you make cards inspired by this tutorial I'd love to see them.

Right, I need to write all my cards and get them in the last post! Next year I will be more organised!

fizzi~jayne x

Friday, 2 October 2015

fizzi~fun~friday.....

When I had a fun day out of the craft den with Laura I mentioned in my post how our chat inspired this new feature for my blog, fizzi~fun~friday!

What is it?

Laura and I were chatting about how we have so many crafty ideas we want to try out. I have lots of techniques I want to learn and I want to grow my creativity so I don't get stuck in a rut, this is for my personal enjoyment as well as hopefully inspiring the range I sell.

So the plan is every other week on a Friday, I will take the day to experiment with new techniques and crafts, as well as revisiting old favourites that I always complain I never have the time to do.

On the list for fizzi~fun~friday (so far!).....
  • Lino printing - inspired by the Handmade Fair, I can't wait to use my starter kit.
  • Calligraphy - I have a set from years ago and a book to get me started.
  • Machine embroidery - I did this a lot at art college and university but I haven't done anything for years.
  • Shrink plastic jewellery - Using shrink plastic is so much fun and I have wanted to use this technique in jewellery making for a while.  Hopefully I'll make some gifts for Christmas.
  • Mixed media art - I want to start an art journal and experiment with my art materials I already have.
  • Using polymer clay to make my own embellishments
  • I want an excuse to use up my stash of paper, card, fabric and yarn.
  • Jewellery making/wirework
  • Take part in more Sunday Stampers.
When does it start?

I guess my day out at the Handmade Fair was my first, but today you will find me in the craft den making a start on my list. Whilst writing this I still hadn't decided what to do first so I will see where the mood takes me but I will be posting photos on Instagram, Twitter and Facebook and using the hashtag #fizzifunfriday.  

I'll publish blog posts for every fizzi~fun~friday the following Friday, so I hope you will enjoy my first post next week!


http://media-cache-cd0.pinimg.com/originals/fc/fa/82/fcfa829a4d55f0ae5e8f45d0bbae8005.jpg:
Found this perfect print on Etsy here by SunshineGraphix.

fizzi~jayne x

Thursday, 1 October 2015

The Handmade Fair....

A couple of weeks ago I went to the Handmade Fair, you may remember I went last year and loved it so much I booked my ticket as soon as they became available.

Last year it was in the grounds of Hampton Court Palace, however this year it was across the road instead. I was a little disappointed as I am a big Tudor history geek but I caught a glimpse of the Palace and anyway, it wasn't a history day out it was a fun crafty day out!


The Super Theatre with moody dark clouds. There were showers during the day but it didn't dampen my fun.
Kirstie Allsopp is the founder of the event and Kirstie and her team have kept the crafty festival feel that I loved last year.  There are different tents for shopping, workshops, a Super Theatre and lots of yummy food stalls which made it really hard to decide what to have for lunch!


The two shopping villages were full of inspiration by talented artists and creative small businesses. There were also stalls selling craft supplies too, however there did not seem to be as many of my favourite paper and general craft stalls but still enough for me to be tempted and spend money!

The obligatory shopping haul photos....


What I enjoy most about this event is the workshops, it's a great way to try out a new craft. When I bought my ticket I booked a Grand Make workshop, Super Theatre session and a Skills workshop. There is a lot of choice over a wide range of crafts. 

Grand Make workshop - Wirework with Lucy Elisabeth

First up was a wirework workshop and I made this hanging heart which can be used as a photo holder.  I might need a bit of practice but it was easier with Lucy's tips than any attempt I have made before at home.


Lucy also had a stand in one of the shopping villages and her work is amazing.

Super Theatre -  Calligraphy with Chiara Perano


The Super Theatre sessions are hosted by Kirstie and are a chance to hear from top experts on various topics.  This year I opted to find out more about calligraphy.

Chiara taught Kirstie the art of Calligraphy whilst sharing her tips.  Kirstie said she always attends these sessions as a complete novice so we really see her learn.  The Super Theatre sessions aren't interactive workshops so I may have not had a chance to practice myself but I came away with lots of tips to practice.

I have a calligraphy set which I used to make my handwriting neater for my wedding invitations and have not touched it since.  Calligraphy is a skill I want to develop and I recently bought a book to learn more so I was pleased there was an opportunity to get some tips from Chiara.

Skills workshop - Lino Printing with Zeena Shah

I was so looking forward to this.  I missed out on it last year due to timings and there being so much to choose from. 

Cutting the lino is very therapeutic.   I tried a star design first but I may have got carried away with the cutting as it didn't look like a star by the time I finished! 

I had more success with a simple heart and made a repeat pattern for this card.


I had a lot of fun with this, so I bought a starter kit! I love stamping and I can see the potential of creating my own designs to stamp with using lino.

I had time to fit in another workshop so I opted for a papercraft one with Craft Asylum.  It may not be a new skill but I was in the mood for some papercraft and making a bird house looked like fun.


I was surprised that I managed to get this home safely I still have the template and I think I could tweak it so I could use it to put sweets and treats in as gifts for stocking fillers at Christmas.

Whilst at the fair I was so pleased I got to meet one of my #CraftBlogClub buddies, Hannah from Crafternoon Cabaret.   Hannah had a busy weekend as she was running her Crafternoon Cabaret workshops in the VIP tent over the 3 day event so it was so lovely we had a chance to meet in person and catch up over a glass of Prosecco.

After the fair, I met up with hubby so he could treat me to dinner and whilst walking to Borough Market we found the "Performer" by Adam Frank, an installation under Southwark Railway Bridge.  It's on from 5pm until 11pm everyday and as you walk under it sets off a sensor which starts an applause. The more you move the louder the applause gets.  You can watch a video of it here but here is a photo of my acting the fool....


fizzi~jayne x

Monday, 10 August 2015

fizzi~jayne's crafty tips for stamping.... #3 how to stamp

If you have been following the series so far you will know which ink to choose and have your basic materials to get started, so now lets get stamping!

(In this tutorial I use an unmounted acrylic stamp, details of other types of stamps are covered in #2 Basic Materials Needed).


These are what I will be using in this tutorial plus I have some baby wipes to hand out of shot.  Please excuse the state of my stamping block, it is well loved!  I am working on a glass craft mat.

Preparation

  • Use a flat, stable surface to work on
  • Protect your work surface ideally with a craft mat but if you use something like newspaper ensure the area is completely flat and smooth.
  • Choose the right ink for your project (see #1 types of ink post).
  • If you are using an acrylic unmounted stamp like in this tutorial you need to apply this to your stamping block.  Acrylic stamps cling to blocks without any need for adhesive or foam. Rubber stamps need cling foam, more details about stamps can be seen in the #2 basic materials post.
For acrylic stamps it is best use Sellotape to lift off any residue left from the manufacture process. Just gently press the Sellotape on the stamp and lift, just like you are getting lint off your clothes.


Also with any new stamp before stamping on your project try it on a scrap piece of paper or card to get used to how much pressure you need to apply.

Now you're ready....
  1. Take the ink pad to the stamp, not the other way around and gentle tap the ink over the stamp. This way you have more control of where the ink goes and how much you put on, ensuring there is an even coverage.You don’t need to use extreme pressure, squashing the stamp into the ink pad will get way too much ink on the stamp! Look at the stamp to make sure it’s completely inked.
  2. Wipe ink from around the edge of the stamping block so you don't get any unwanted ink on your project (also make sure your fingers are clean after applying the ink to avoid unwanted fingerprints on your work).
  3. Decide where you want the image and stamp straight down without rocking. You need to be able to apply pressure from above so standing might help. Always keep one hand steady whilst the other applies pressure across the stamp. You don't need a lot of force but depending on the detail of the design, how big the stamp is and the type of stamp, some may need more pressure than others, this is why it is best to practice on a scrap piece of paper/card.
  4. Lift the stamp straight up.
Et voilà!


If you are using a detailed image or you want more definition and you are not intending to use alcohol pens, Archival ink will give a better impression....


Now clean your stamp in warm soapy water or with a baby wipe without rubbing to hard. If you are using a solvent based ink you will need a specific cleaner.

As with any craft, things may not go as you imagined but if there is a smudge or you missed a bit or there is ink on the page where it shouldn't be, don't panic and don't throw it in the bin! Not straight away, you may be able to save it by using your paints / pens to disguise it or use an embellishment to cover it up.  

This may not be possible and even if it is you want to know how to avoid these happy mistakes happening again, right?  So here are some top tips to help you get the results you want....

Troubleshooting....

Lines of ink from the stamping block
  • The acrylic block may be too big for your stamp which can lead to the block rocking.
  • If there is ink on the block you need to wipe around the edges before stamping with a damp cloth or baby wipe.
  • Are you taking the ink pad to the stamp for application?

Shadows / smudges / double image
  • It's likely the stamp moved. Try and keep a steady hand and don't think too much about it, just stamp and always keep one hand steady on the block whilst the other one is applying pressure. Try not to rock or move the stamp.  This may take some practice when you first start.

Missed patches 
  • Not enough ink on the stamp.
  • You didn't apply pressure on that area. 
  • If it is a detailed stamp or you are stamping onto a material like MDF you may need a foam mat to help get an even coverage. 
  • Is there something underneath your project that shouldn't be there?
  • Are you in the right position? You need to be applying pressure from above.
  • Are you using textured card?
Missed patches can sometimes be filled in by using your pens. 


Still not getting the right results?
  • Are you using the right ink? Check back to my first post in the series, as some inks are better for detailed, crisper images.
  • Try a different type of paper or card.
  • Is the stamping block the right size for the stamp? It needs to be slightly larger than the stamp. 
  • Try standing up so you are above the stamp giving you more control and it may be easier to apply pressure on the stamping block.
  • Placing a foam mat (or mouse mat) under your paper/card may help.

Don't worry if you make a mistake, just have fun, what's the worst that can happen? You have to throw a piece of card away, no big deal.  

If you have any problems I haven't mentioned please ask me in the comments as I would love to help and I will have made the same happy mistakes at some point.

You now have the materials and the techniques to get you started so if I have inspired you to start stamping I would love to see your projects.  You can tag me on social media or leave a link in the comments below. Or please feel free to email me your photos at fizzijayne@gmail.com and let me know if I can share your work, don't worry if you don't want me to I would just love to see what you have done.

Coming soon ~ Next in my stamping series I will show you a really cool technique, heat embossing!

Happy Stamping!


Also in my crafty tips for stamping series....


http://fizzijaynemakes.blogspot.co.uk/2015/07/fizzijaynes-crafty-tips-to-stamping-1.html
#1 Types of ink

http://fizzijaynemakes.blogspot.co.uk/2015/08/fizzijaynes-crafty-tips-for-stamping-2.html
#2 Basic Materials Needed