I would definitely consider myself a messy crafter, not just by the state of my desk but also because I love getting out paints, inks and using lots of different mediums together and they usually end up all over my hands! I have always used whatever I have, mixing medias, to create the look and effect I want. In the last year I've noticed mixed media is becoming more popular and if you've not tried it this is why I think you should....
- There are no rules.
- You don't need to be able to draw or consider yourself an artist.
- Many materials = endless techniques
- Encourages risk taking and not worrying about the end result
- Multiple materials can inspire new ideas
- Anything goes, so collect everything!
- It's FUN!!!
To get you started I am going to show you a great way to use up your crafty stash and create a piece of mixed media art....
What you need
- Box canvas. You can get these quite cheaply. I got a pack from Wilkos
- Gesso, white or black
- Acrylic paint, choose co-ordinating colours of your choice. I recommend 3 or 4 but remember there are no rules! You can also use tester pots or left over emulsion to co-ordinate with your home decor
- Paint brushes and sponges
- Embellishments from your crafty stash, anything goes. It doesn't matter what colour they are. This is a great time to use the bits and bobs you don't really like or you'll never use.
- Strong PVA or a hot glue gun
Optional
- Texture paste
- Stencil of your choice
- Palette knife
- Gilding wax
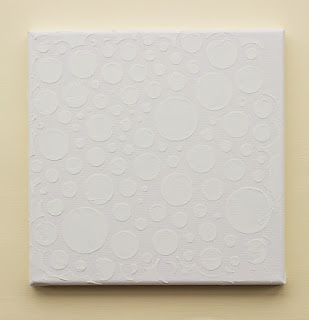
To get started I placed a stencil on the canvas and spread the texture paste over it with a palette knife. I wasn't concerned about it being smooth, the aim is to add texture. If you don't have texture paste or stencils you can miss this step.
Next arrange your buttons, ribbons, wooden embellishments, any random bits and bobs you have collected on to the canvas. It doesn't matter what colours they are or if they clash because they won't stay like that. Once you are happy with the arrangement glue them down securely with a strong PVA or glue gun. You can also use your glue gun to create patterns and add texture.
If you are using the texture paste you can stencil over some embellishments as well like I have done with this ribbon.
Once the glue has dried go over everything with white gesso. This will prime the various surfaces of the embellishments, paste and canvas so they can take the paint. Without gesso, the paint would soak into porous surfaces and/or dull the colours of your paint if the original surface is dark. Gesso is not opaque so you will still see some of the colour peeping through.
You may like this effect, if so you can stop here. Or if you want a more 'white on white' effect then paint again with white acrylic paint.
Both gesso and acrylic paint may not cling very well to shiny or plastic items, but that's OK, I have a solution for that further on. Just paint over what you can.
Now, with your acrylic paints in various colours here are some options as to what you could do next....
With a dry brush add colour to highlight details. If you don't like the streaks of the dry brush just add a little water to your brush.
Go lightly with the paint, you can always add more but it's harder to take it away. However if you have over worked any areas use the gesso to calm it down and blend.
I only used 2 colours in this piece which were inspired by the embellishments used.
To highlight areas, and to cover the buttons that wouldn't completely cover with the paint, I used silver gilding wax. I love this stuff! It can really make a piece pop and it covers the areas that the paint couldn't.
For this next one I created I used a lot more colour....
After painting with white gesso, I applied a base coat in the palest colour roughly with a brush.
I used sponges in the next step to get a different finish. I added orange and green paints and went back over areas with the pale colour to add depth and help blend the colours. I just kept adding colour until I was happy with how it looked.
I used the gesso again to highlight areas and added wooden words found in my stash to finish it.
You can also use gesso in black which is what I used for this one....
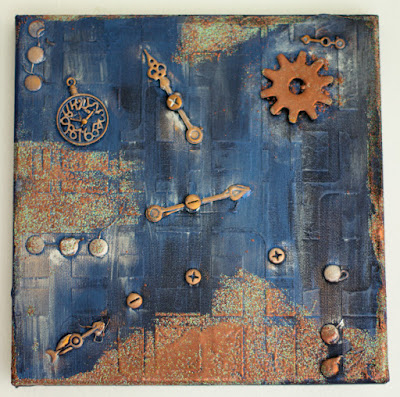
I followed the same process of stencilling then painting with black gesso and I used metallic acrylic paint and applied it with a dry brush allowing some of the black to still show through.
I highlighted areas with gilding wax
I then added Aged Copper Frantage to add even more texture and give it an aged look. This works like embossing powder (you can check out my tutorial on embossing powder here). I roughly added a Versamark ink pad over areas I wanted the frantage to be and sprinkled the powder over these areas. I wasn't worried about it being neat or if the powder went in other areas. Using a heat tool I heat embossed the frantage powder and then repeated this 2 or 3 times in areas so it was thicker in different areas.
This is definitely my favourite! Different colours are more prominent depending on the light and angle due to shine and texture of the paints, gilding wax and frantage.
Here you have three very different looking pieces of art using up my stash. What do you think?
If you create a piece of art inspired by this tutorial I'd love to see it so please tag me on social media.
This tutorial is for non-commercial use only. You can make for yourself, gifts or to raise funds for a charity but please don't make any to sell for profit.
If you want to blog about this project, remember to credit me and link back to this blog. Please ask permission before using my photography and please do not reproduce my entire tutorial. Thank you


